Laser Engraver/Cutter Exhaust System
This post contains affiliate links. I receive a commission when you purchase through these links.
New Laser
Recently, I purchased a used laser cutter/engraver off Facebook Marketplace, and it’s been fun as I’ve been learning it more and more.
Right away, I needed to figure out how I was going to handle the exhaust.
Laser cutters and engravers work by heating up, and typically burning, material to achieve the cut or engrave. That process will create smoke, not always visible. However, you can definitely still smell it, and your body won’t enjoy it either, depending on the material.
Fortuately, the Creality Falcon A1 I purchased is meant to be pretty enclosed, and has an exhaust fan and hose built-in. I was planning on putting it in my basement, as that is my usual workshop area. I figured I’d just be able to vent it out the windows pretty easily.
As soon as I got it, I wanted to begin some test cuts, so I opened the basement window, shoved the hose in it, and stuffed some blankets around it. That did barely anything, and you could see the smoke starting to collect near the ceiling. At that point, I knew I was going to need to figure out a solution ASAP if I wanted to keep using it.
The Challenge
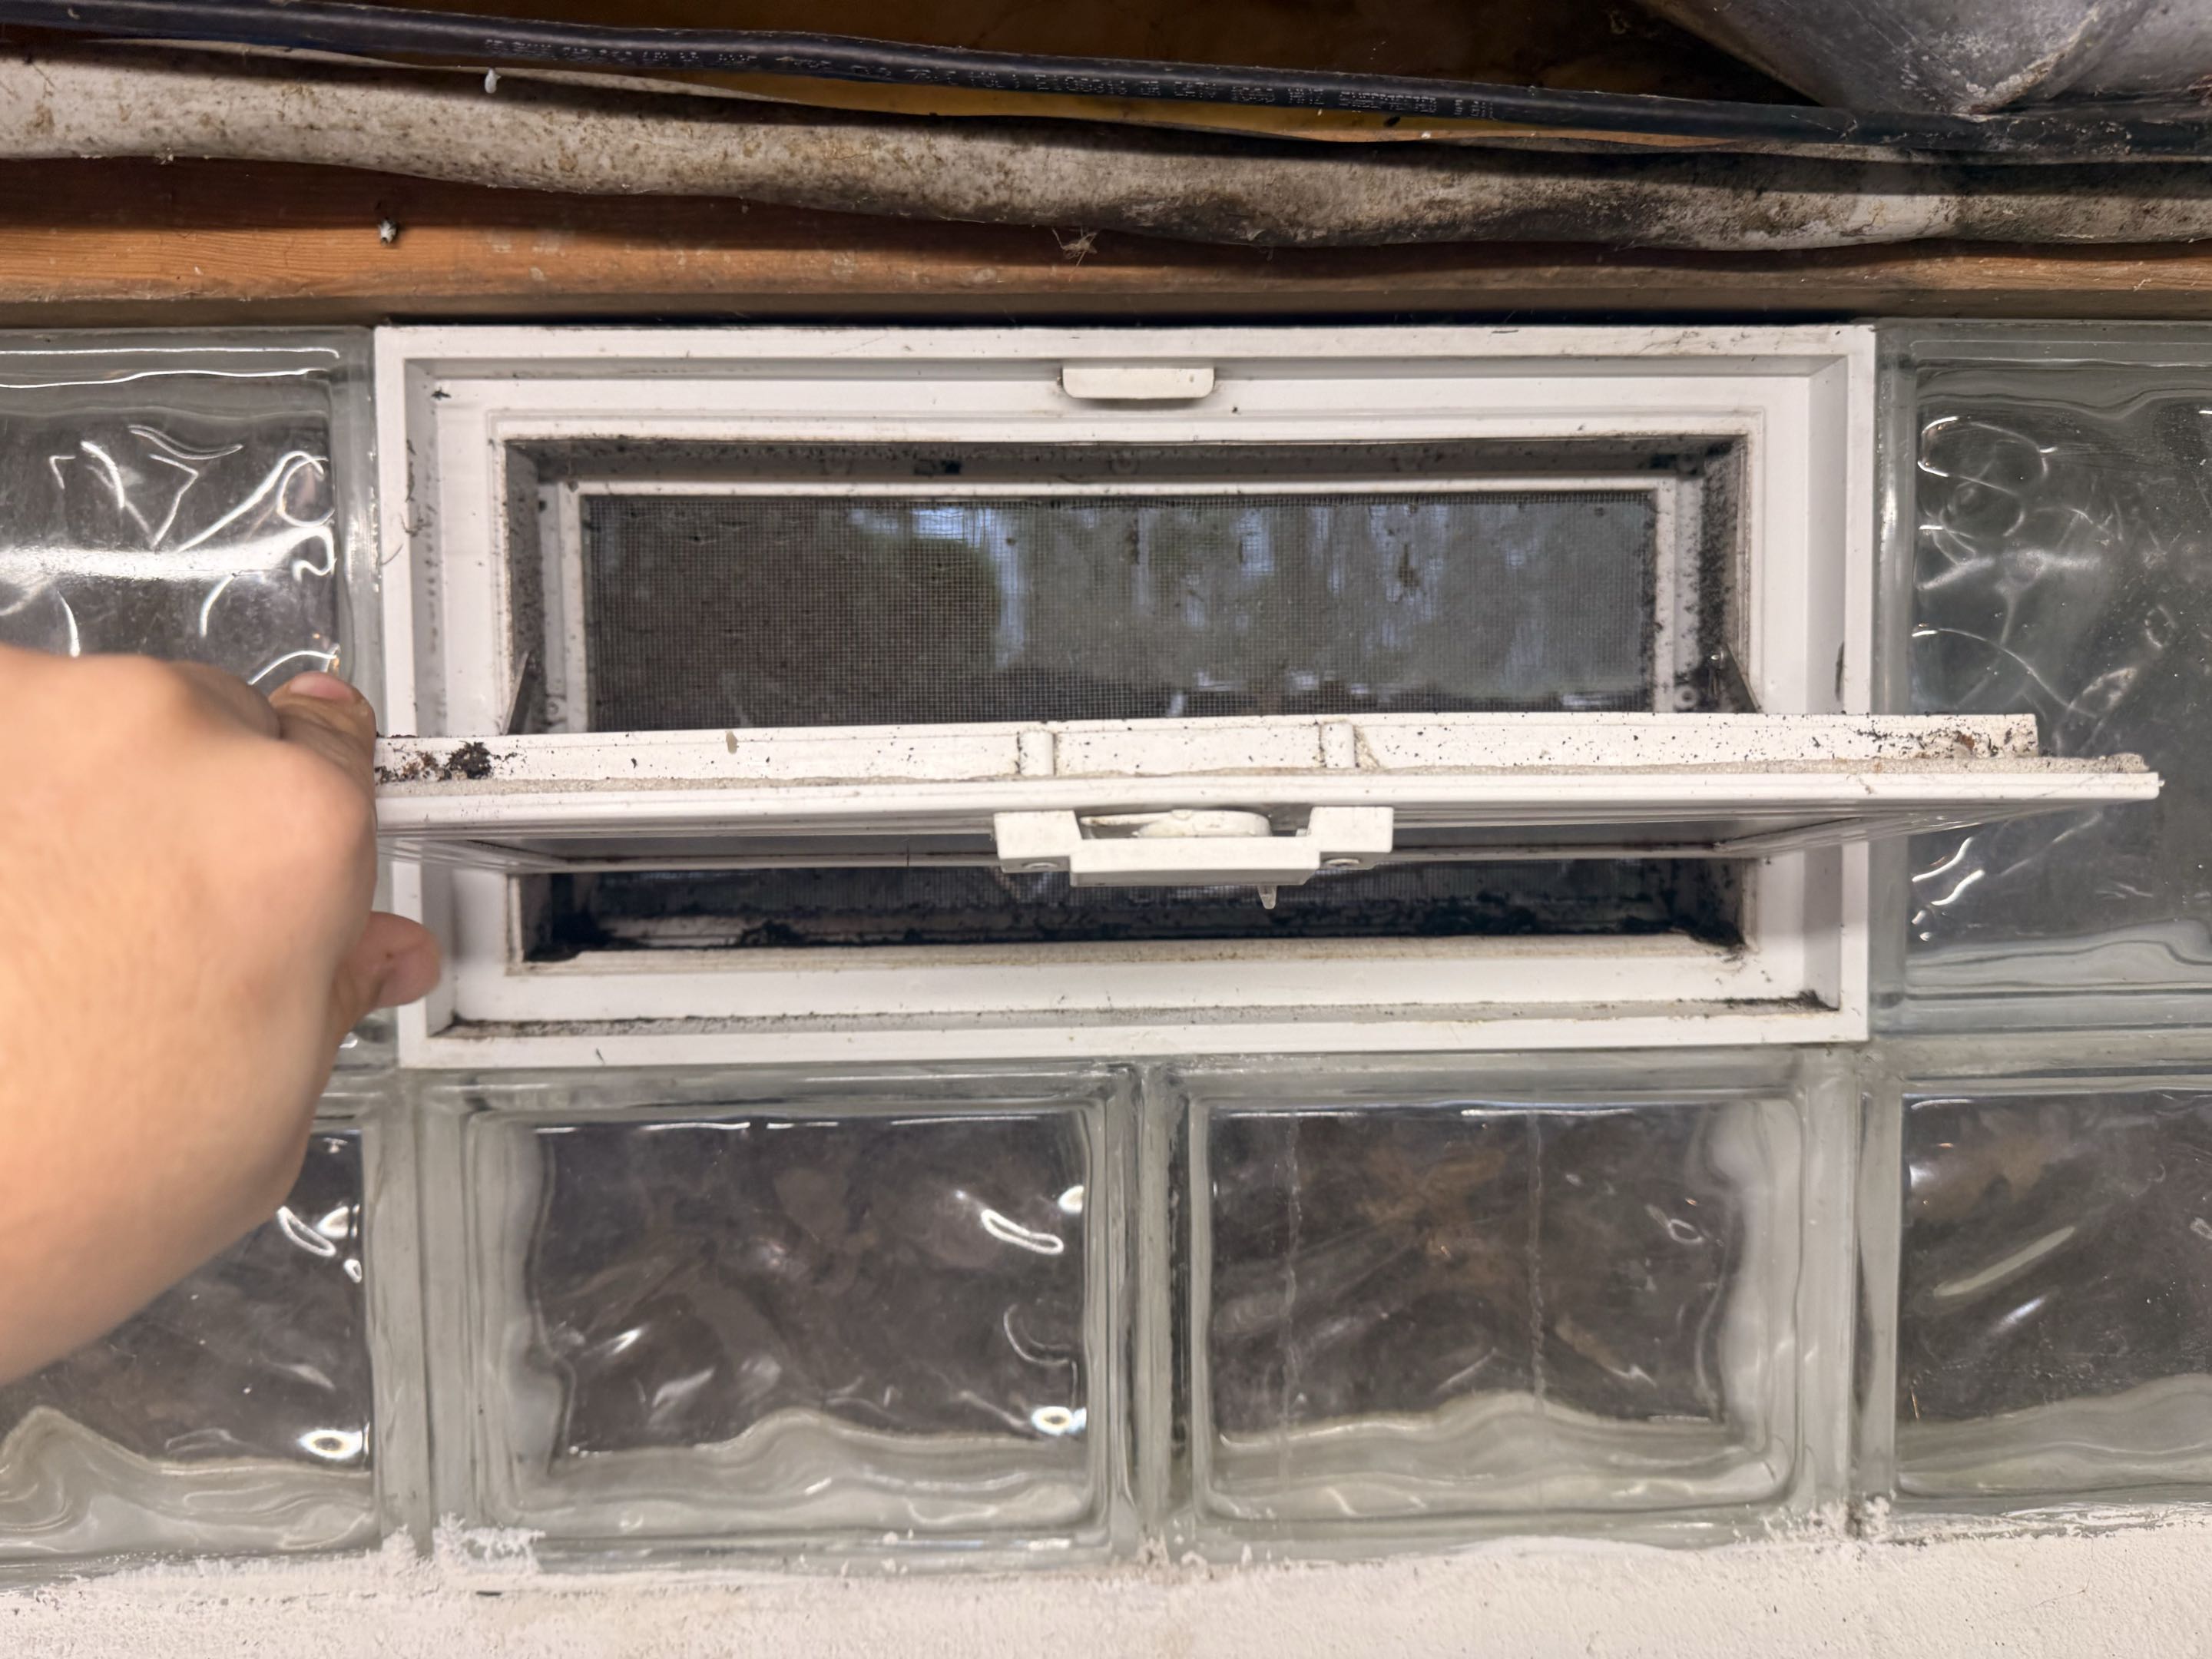
My basement has the typical glass block, mini hopper window. I searched all over the place and I couldn’t find a great solution on attaching a vent to it.
I figured maybe I’d just make a little piece that sort of wedges in at the top, and the hose connects. But I soon realized, the window doesn’t just fold down and open on one hinge; it pivots, meaning there’s another spot that would need sealed.
This is also a rental unit, so I couldn’t easily just replace the hopper with a vent. At first, I thought to 3D print something. After searching for a while, I couldn’t find a model that would work, so I knew I was going to need to make something custom.
I soon also realized that the length of the window would exceed the bed of my 3D printer, so it’d also need a way to join. I’m not the best CAD engineer, so I quickly dreaded the idea of designing this part.
After looking around a bit, and some further thought, I came up with an idea.
The Solution
This piece doesn’t need to be complicated. It needs to be able to seal with the glass block, have an opening and seal for the hose, and be easy to remove whenever I move out.
I had some old foam board lying around, and some foil duct tape. I realized I could put something together pretty quickly and easily with that.
First thing, I needed to remove the actual pivoting window. There were simply just two screws on each side that had to come out to take it out, leaving just the mesh screen and opening in the glass block.
From there, I cut the foam to size to fit in that gap, and cut out a hole roughly the size of my exhaust hose. Then, just tape it up to get a basic seal.
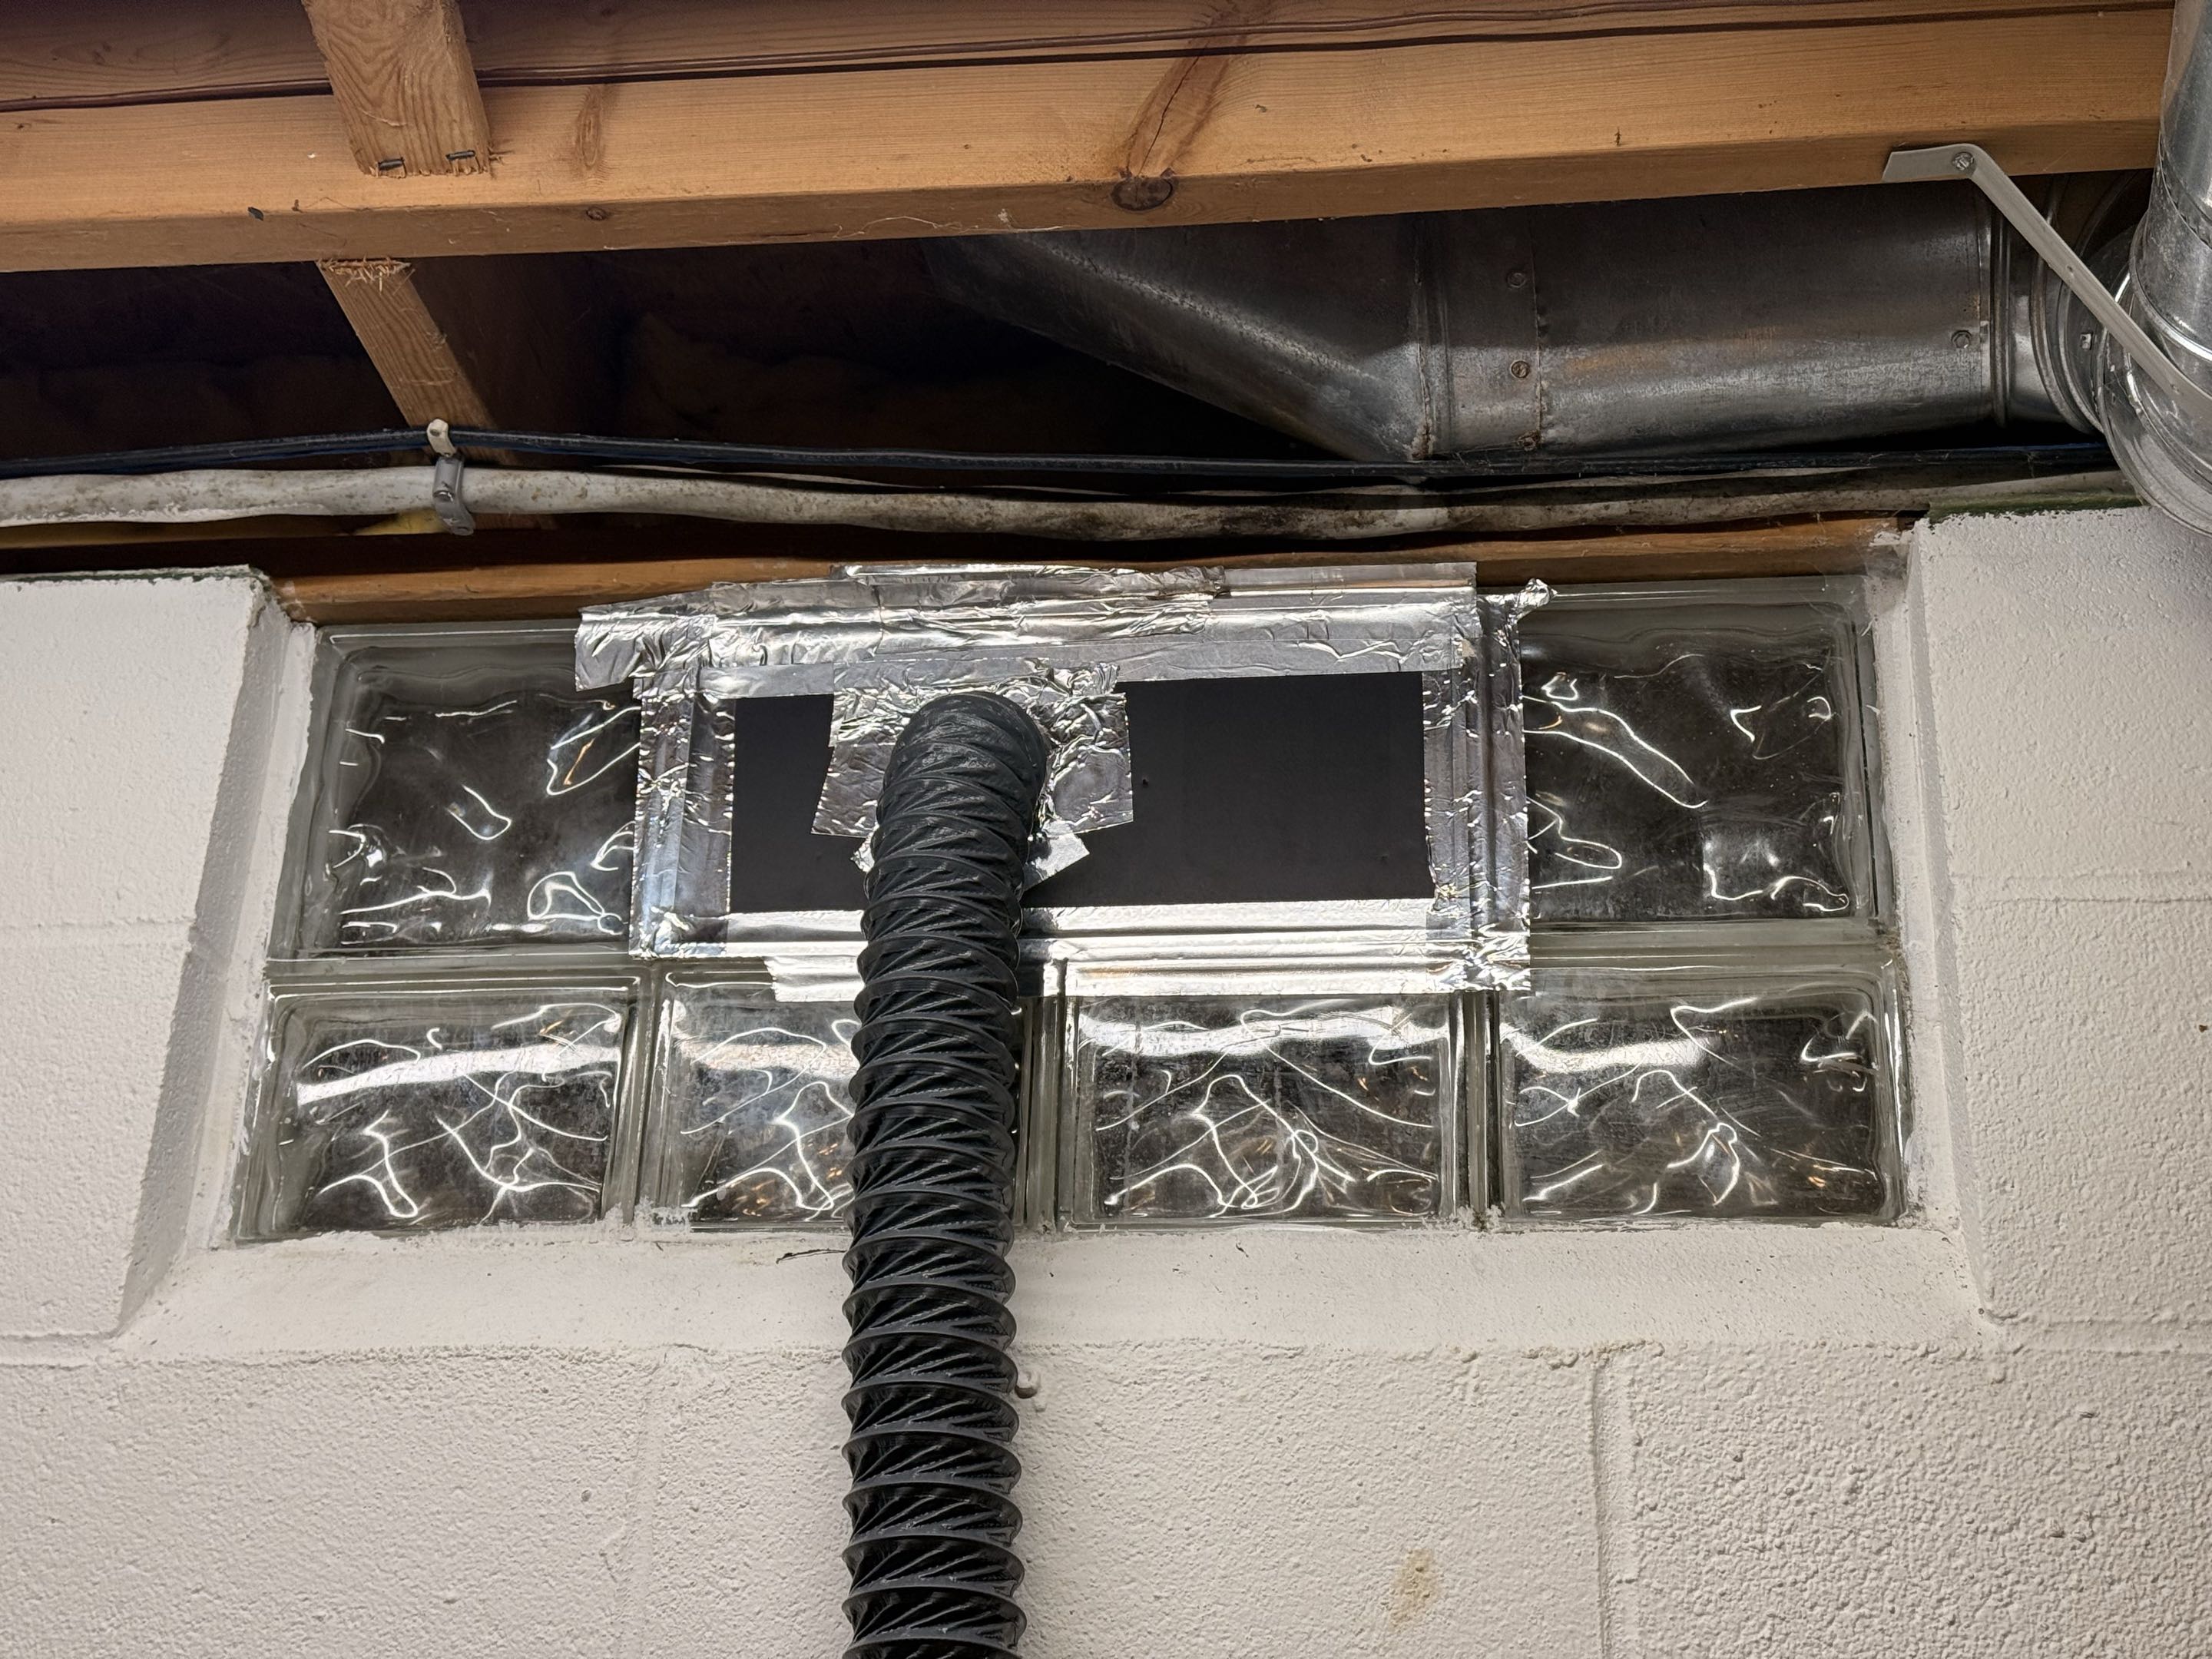
Is it pretty? No. It’s an unfinished basement, and absolutely no one will see it but me, but most importantly, it works. I ran a test cut on the laser, and I saw no smoke excaping, and felt no draft around my new “adapter”.
Improvements
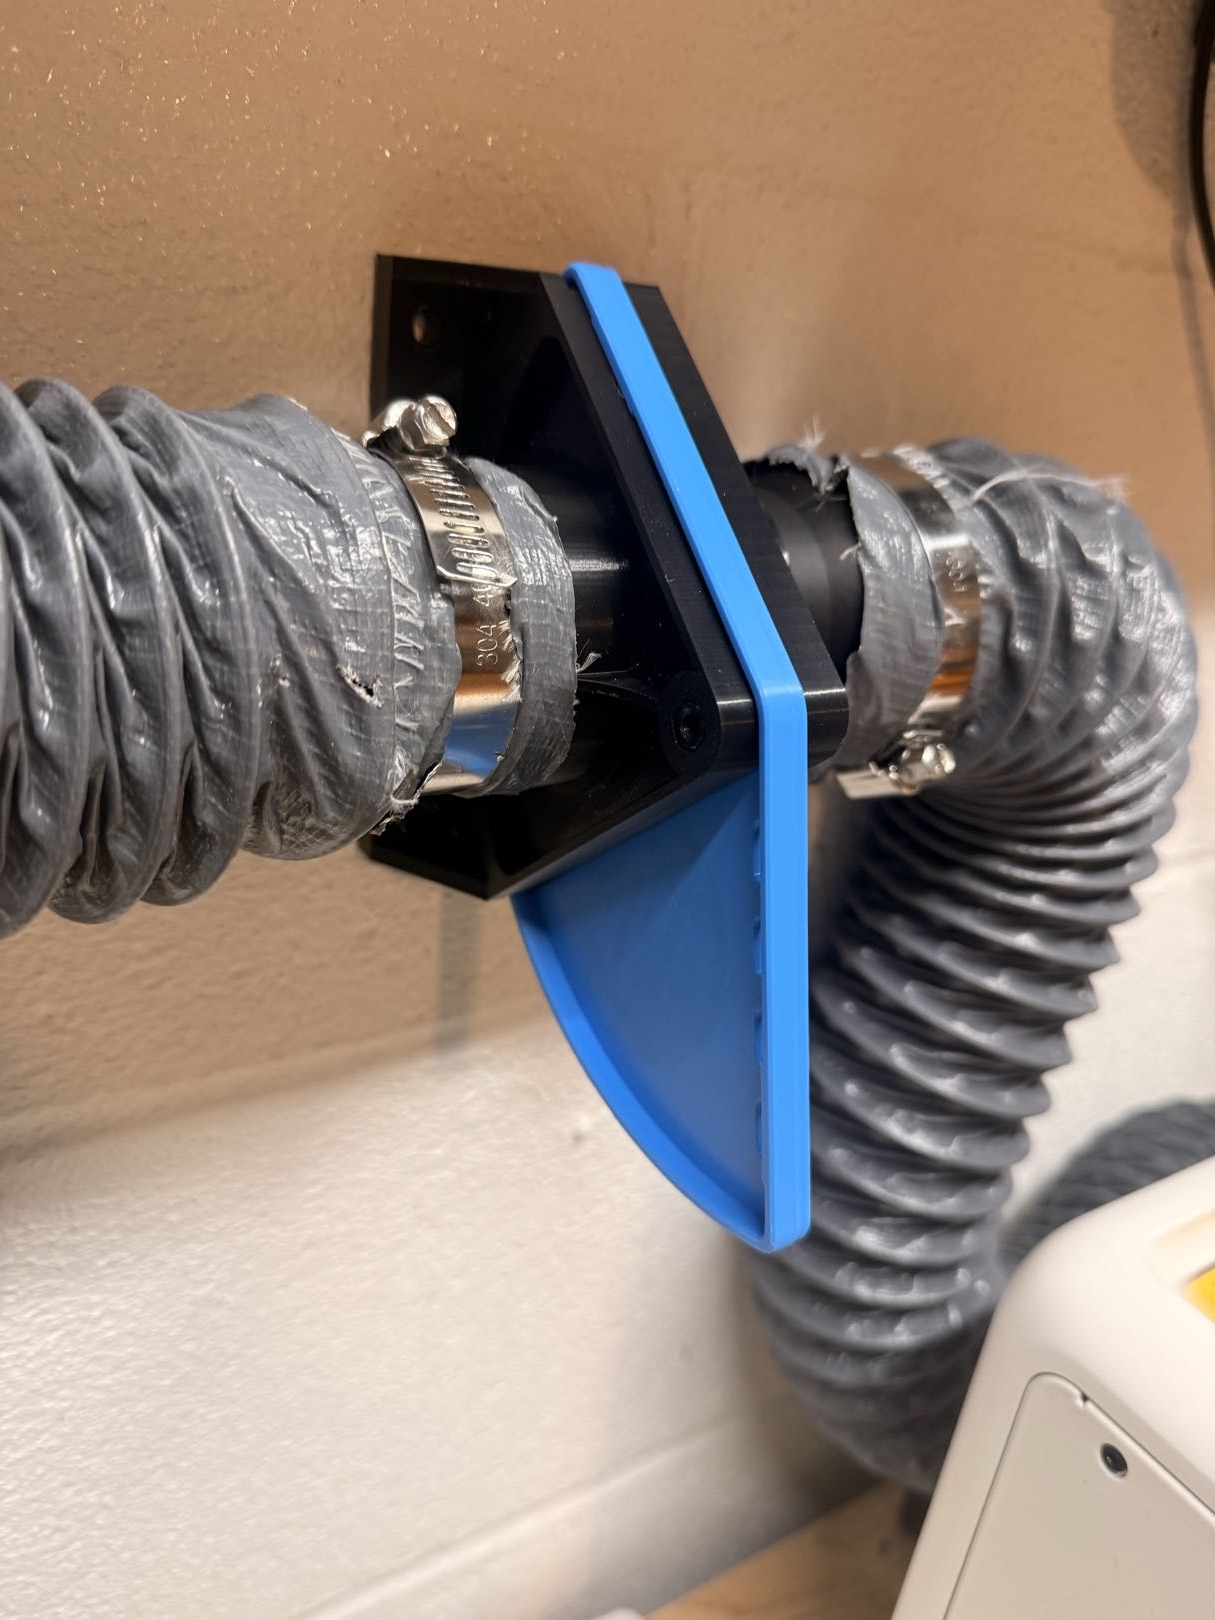
Blast Gate
There’s a good chance you’ll want to close off that exhaust to the outside when you’re not using it, to avoid letting warm or cold air in.
The easiest way to do this is with a simple blast gate. I found this model online, and printed it out and attached it to my hose. It seals very well and definitely helps prevent drafts. You’ll need some rubber o-rings to get a complete seal. I’ll link the ones I purchased down below.
Inline Exhaust Fan
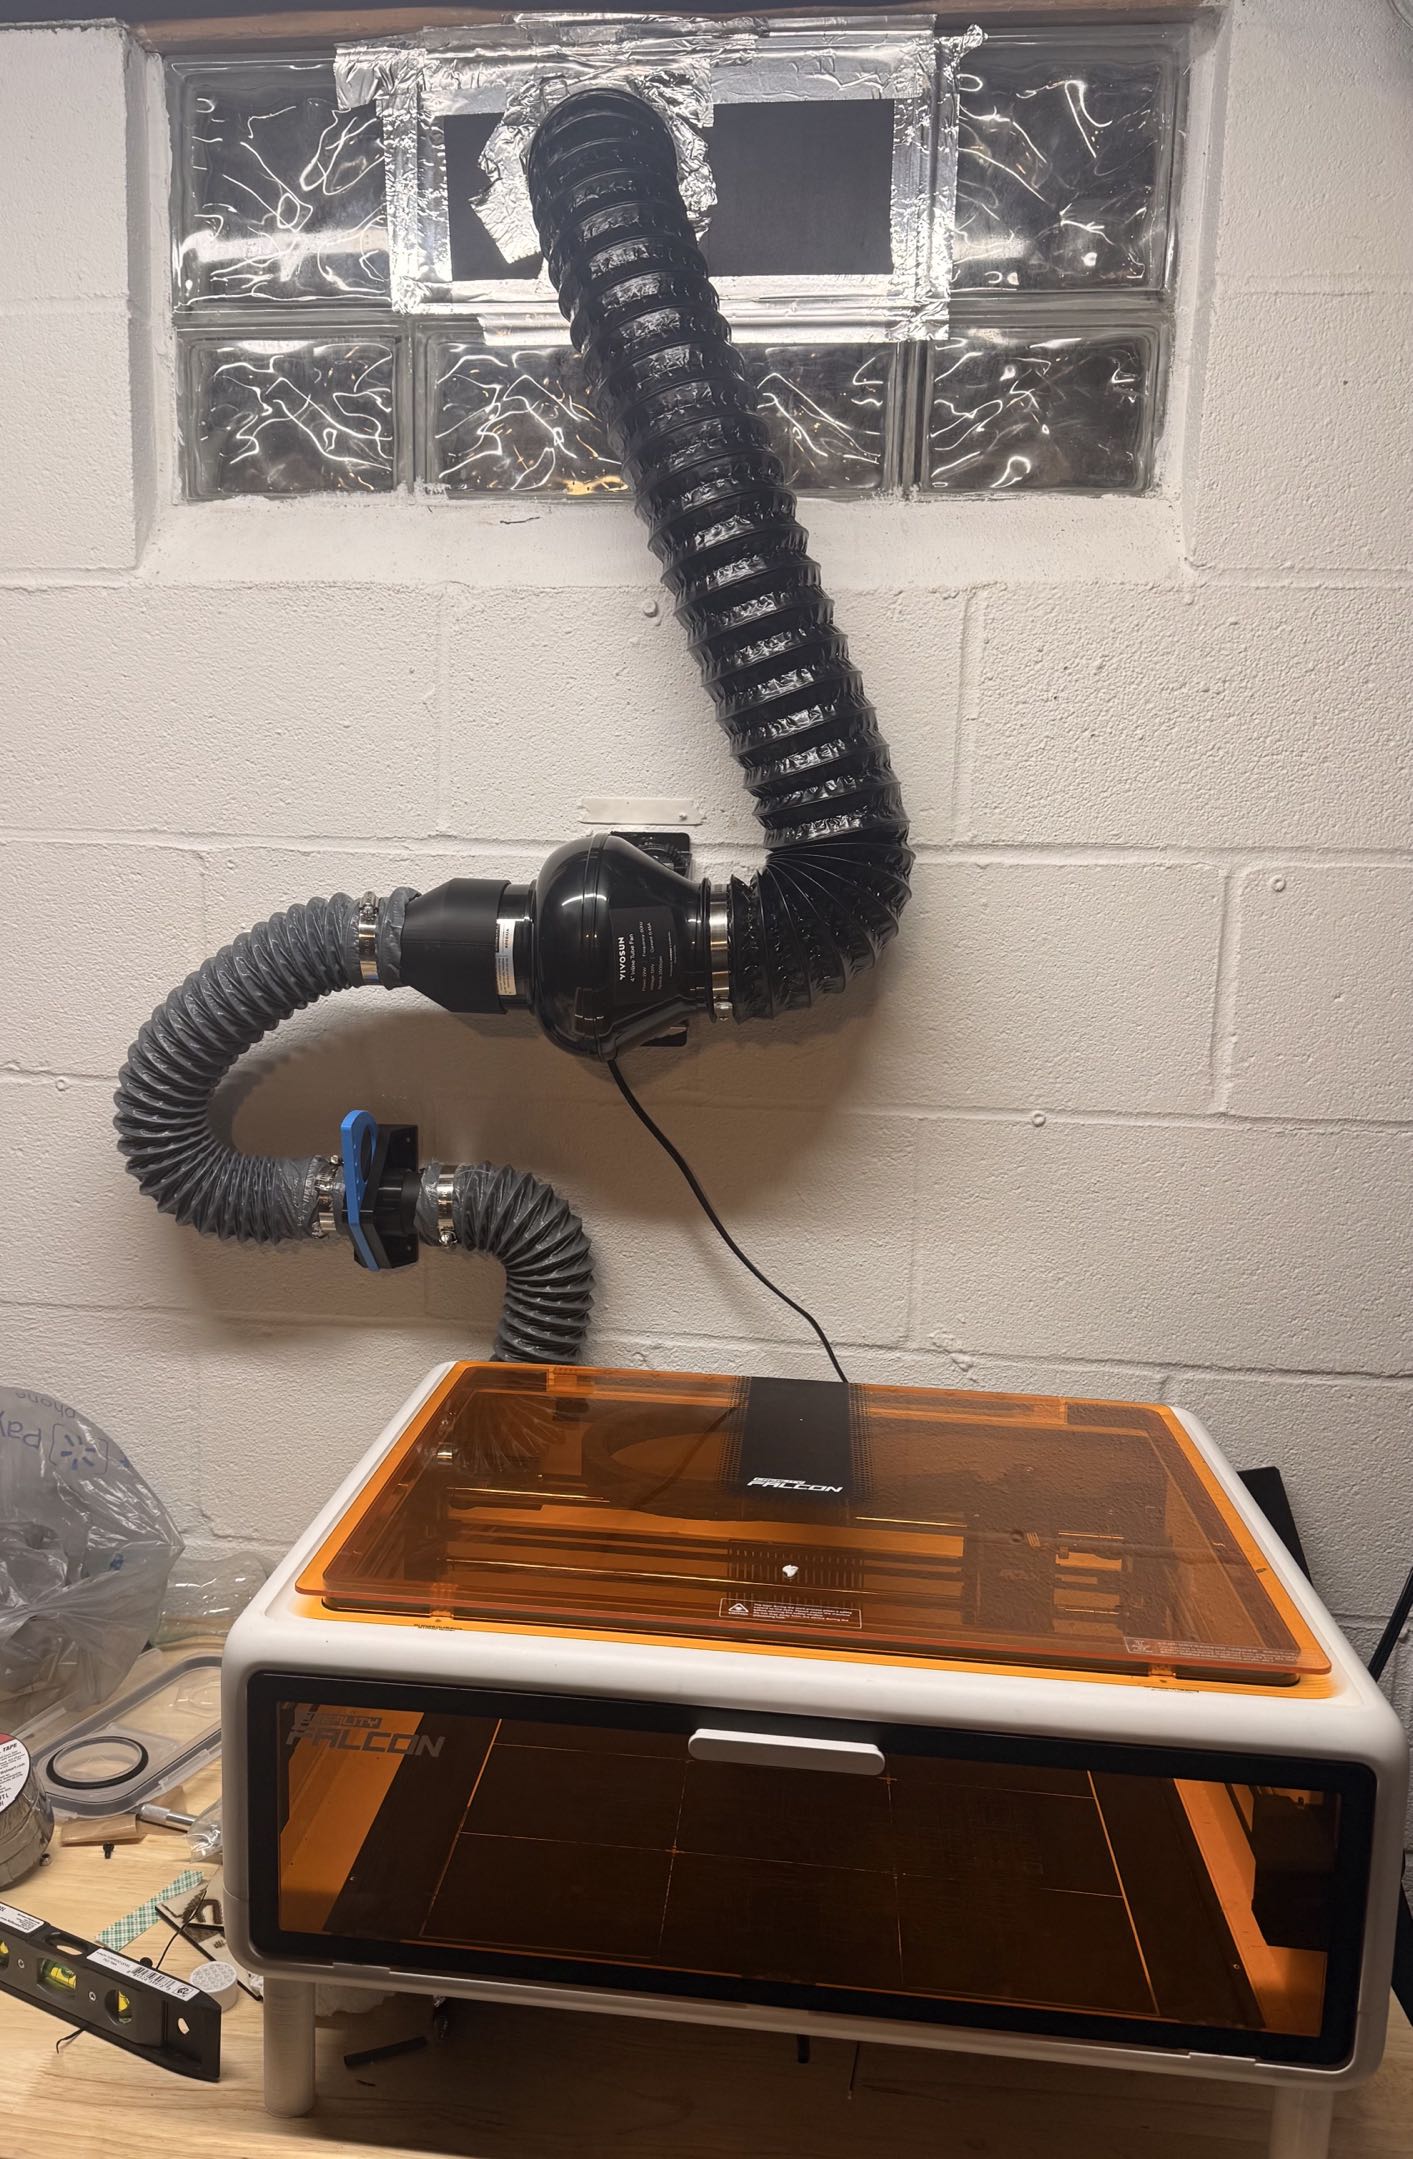
At a point, I picked up a rotary module to do cups, mugs, etc with the laser. With the Falcon A1, this requires removing the bottom plate, and raising the cutter up to give enough clearance.
While the Falcon A1 has safety windows for the laser, as soon as you remove the bottom plate, you open up significantly more risk of laser exposure. Laser safety goggles are an absolute must with the rotary module. I’d recommend getting a pair, even if you keep the unit fully sealed and enclosed. Your eyesight is worth the extra dollars.
No big deal, but I very quickly realized that the weak exhaust fan in the unit wasn’t going to cut it, especially when it runs at a pretty low speed if you’re not on full power with the laser.
I decided to get an inline exhaust fan to get more airflow pulling through, and be able to run it easier at my control, even if I have to E-Stop the machine.
I picked up an inline duct fan off Amazon. Most of the fans you’ll find use 4" ducting, so I 3D printed an adapter to fit the hose that comes with the Falcon. I also picked up an extra short section of 4-inch ducting to connect to my window seal.
It definitely makes a big difference, and I would recommend it.
Hopefully this helps someone else down the line in a similar situation, and helps save you some time and hassle.
Thanks for reading!
Product Links
Linked below are some of the products referenced in this post, if you’d like to check them out. Using these affiliate links below helps support this blog, without any additional cost to you.